Tracking Setup
Google Consent Mode v2: Setup Guide for GTM and GA4
Google Consent Mode v2 changes how your tags behave based on what a user agrees to on your consent banner. If you run Google Ads or GA4 on any site serving visitors in the European Economic Area, this isn’t optional — Google made it a requirement in March 2024 for continued access to remarketing and conversion data. This guide covers exactly how to implement it in Google Tag Manager, which mode to choose, and how to confirm it’s actually working.
Why This Matters
Consent mode is Google’s answer to a specific problem: how does a tag manager respect a user’s privacy choices without losing all measurement signal? Without it, you’re stuck choosing between two bad options — fire all tags and potentially violate GDPR, or block all tags and lose conversion data entirely.
Consent Mode v2 introduces a middle path. When a user denies cookies, your tags don’t fire in the traditional sense. Instead, they operate in a cookieless mode, collecting minimal behavioral signals that Google uses to model the missing data. The result is that your conversion reporting stays directionally accurate even when 30–40% of users deny consent.
What changed from v1 to v2
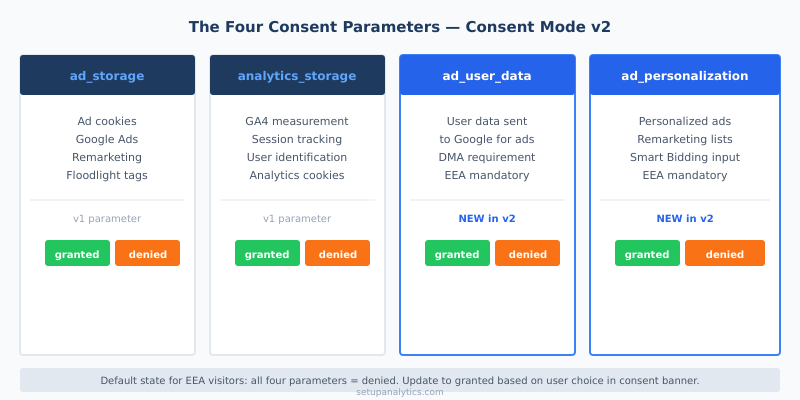
Consent Mode v1 used two parameters: ad_storage and analytics_storage. That covered ad cookies and analytics cookies respectively. Version 2 adds two new parameters that specifically address the EU Digital Markets Act requirements: ad_user_data and ad_personalization.
These new parameters control whether Google can use data for personalization and whether user data can be sent to Google at all for advertising purposes. Without them, Google treats your setup as non-compliant and limits remarketing functionality for EEA traffic.
What happens if you skip it
The consequences are concrete. If you don’t implement Consent Mode v2 by Google’s deadline:
- Remarketing audiences stop updating for EEA users
- Smart Bidding loses signal from EEA conversions, which degrades campaign performance over time
- Conversion reporting for EEA traffic shows gaps rather than modeled completions
- You face potential exposure under EU DMA compliance obligations — Google’s EEA consent requirements for Google Ads spell out exactly what’s enforced
For sites where EEA users represent even 10–15% of traffic, that’s a meaningful data gap. The fix isn’t complicated, but it does require setting things up correctly in GTM.
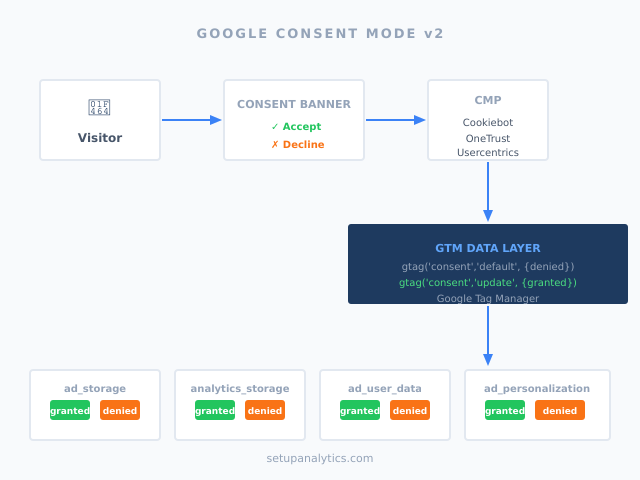
How Google Consent Mode v2 Works
The mechanism works through two types of calls: a default consent call that fires before any user interaction, and an update consent call that fires after the user makes a choice on the consent banner.
The four consent parameters
Every implementation needs to handle all four parameters. Here’s what each one controls:
| Parameter | Controls | Typical default |
|---|---|---|
ad_storage |
Cookies used for advertising (Google Ads, Floodlight, remarketing) | denied |
analytics_storage |
Cookies used for analytics measurement (GA4 session, user identification) | denied |
ad_user_data |
Whether user data can be sent to Google for advertising purposes | denied |
ad_personalization |
Whether ads can be personalized for this user | denied |
Setting all four to denied by default is the safe and recommended starting point for EEA visitors. The update consent call then flips the relevant parameters to granted based on what the user accepted in the consent banner.
Default consent state and update calls
The two calls work in sequence. First, before the page loads any measurement tags, you set the default state:
gtag('consent', 'default', {
  'ad_storage': 'denied',
  'analytics_storage': 'denied',
  'ad_user_data': 'denied',
  'ad_personalization': 'denied',
  'wait_for_update': 500
});
The wait_for_update parameter (in milliseconds) tells Google Tags to pause and wait for the CMP to send a consent update before firing. After the user interacts with the consent banner, the CMP triggers the update:
gtag('consent', 'update', {
  'ad_storage': 'granted',
  'analytics_storage': 'granted',
  'ad_user_data': 'granted',
  'ad_personalization': 'granted'
});
In practice, the update only passes granted for the parameters the user actually accepted. A user who accepts analytics but rejects advertising would see analytics_storage: 'granted' but ad_storage: 'denied'.
In GTM, you don’t write these calls manually. Instead, you configure them through the Consent Initialization trigger and your CMP’s integration. More on that in the step-by-step section below.
Advanced vs Basic Consent Mode
Before you touch GTM, you need to make one decision: Advanced or Basic? This choice fundamentally changes what data Google can recover when consent is denied.
When to use Advanced
Advanced Consent Mode is the version that actually delivers conversion modeling. When a user denies consent, the tag fires but operates in a cookieless mode — it sends aggregated, non-identifiable pings that Google uses to model what conversions were likely missed. The share of denied-consent signal that gets recovered varies by traffic volume and consent rate; high-volume sites can recover a meaningful portion, but Basic mode recovers nothing at all.
Use Advanced Consent Mode when your CMP can send consent signals to the data layer in real time, before the page fires any tracking tags. Major certified CMPs include Cookiebot, OneTrust, Usercentrics, and Consentmanager. If your CMP integrates natively with GTM and pushes consent state via dataLayer.push() before the GTM snippet fires, Advanced is the right choice.
Advanced is also compatible with server-side tagging setup, which adds an additional privacy layer for sensitive measurement requirements.
When Basic is your only option
Basic Consent Mode is simpler: all tags are blocked by default until the user grants consent. Once consent is granted, tags fire normally. If consent is denied, no tags fire at all — there are no cookieless pings, no conversion modeling, no data recovery.
| Factor | Advanced Consent Mode | Basic Consent Mode |
|---|---|---|
| Tags fire on denial | Yes (cookieless mode) | No (blocked entirely) |
| Conversion modeling | Yes (variable recovery — see below) | No |
| Data layer integration | Required | Not required |
| CMP requirement | Must support real-time signals | Any CMP works |
| Setup complexity | Medium | Low |
| Recommended for | Google Ads advertisers with EEA traffic | Analytics-only setups, simple sites |
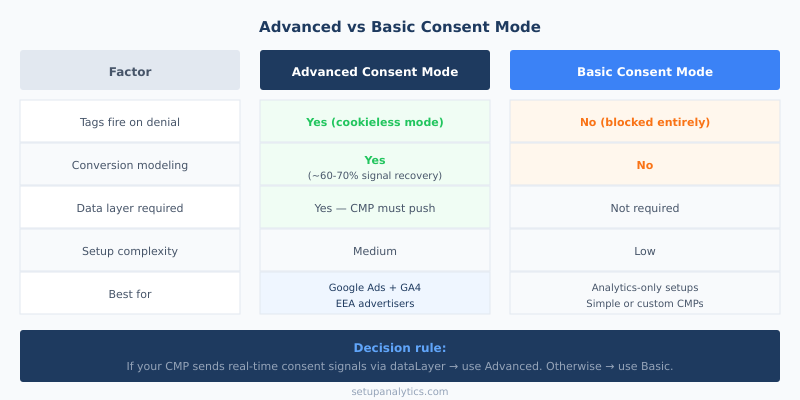
Choose Basic only if your CMP doesn’t support real-time data layer integration. Many lightweight or self-built consent banners fall into this category. It’s compliant, but you’ll pay for it in missing conversion data.
Step-by-Step Setup in Google Tag Manager
The setup assumes you’ve already completed adding the GA4 tracking code and have a Google Tag Manager container running. The consent mode configuration lives on top of your existing tag structure.
Step 1 — Install or update your CMP
Your Consent Management Platform is what drives the consent signals. The CMP collects the user’s choice, stores it, and communicates it to GTM via the data layer.
Check your CMP’s documentation for Google Consent Mode v2 certification. Major certified CMPs include:
- Cookiebot (Usercentrics): Native GTM template available in the Tag Templates gallery
- OneTrust: Dedicated GTM integration via their data layer API
- Usercentrics: Direct GTM template support with all four v2 parameters
- Consentmanager: GTM template pushes consent state automatically
- Borlabs Cookie (WordPress): Built-in Consent Mode v2 support since version 3.x
If you’re using a custom or uncertified CMP, verify it pushes all four parameters to the data layer before the GTM snippet fires. That’s the critical requirement for Advanced mode.
Step 2 — Add the Consent Initialization trigger
In Google Tag Manager, go to Triggers and create a new trigger. Select Consent Initialization as the trigger type. This trigger fires before any other trigger on the page, which ensures the default consent state is set before any tags attempt to fire.
Name it something clear: “Consent Initialization — All Pages”. This trigger is what you’ll attach to the tag that sets the default consent state.
Step 3 — Configure your Google tags with consent settings
In Google Tag Manager, each tag has a Consent Settings section under Advanced Settings. For your GA4 Configuration tag and any Google Ads tags, open Consent Settings and check “Require additional consent for tag to fire.”
Set the required consent types:
- GA4 Configuration tag: requires
analytics_storage - Google Ads Conversion Tracking tag: requires
ad_storage - Google Ads Remarketing tag: requires
ad_storageandad_personalization
GTM uses these settings to automatically respect the consent state when deciding whether to fire each tag. You don’t need to add custom logic — GTM handles the gate.
analytics_storage or ad_storage until the matching signal is granted — you don’t add custom logic for it.Step 4 — Set default consent state via gtag or data layer
This is where the CMP integration happens. If your CMP provides a GTM template (Cookiebot, OneTrust, Usercentrics, Consentmanager all do), install the template from the GTM Template Gallery and configure it. The template handles the gtag('consent', 'default', {...}) call for you and also manages the update call when the user responds to the consent banner.
For a manual setup (if your CMP doesn’t have a template), create a Custom HTML tag with the default consent state:
<script>
  window.dataLayer = window.dataLayer || [];
  function gtag(){dataLayer.push(arguments);}
  gtag('consent', 'default', {
    'ad_storage': 'denied',
    'analytics_storage': 'denied',
    'ad_user_data': 'denied',
    'ad_personalization': 'denied',
    'wait_for_update': 500
  });
</script>
The full list of supported consent parameters and their expected values is documented in the gtag.js consent reference — useful if you’re configuring consent calls outside of a CMP template.
Attach this tag to the Consent Initialization trigger from Step 2. Then create a second Custom HTML tag that fires when your CMP triggers the consent update event — this tag calls gtag('consent', 'update', {...}) with the values from the data layer.
Your CMP should push an event to the data layer when the user responds. Cookiebot, for example, pushes a CookiebotOnConsentReady event. Create a Custom Event trigger in GTM to catch that event and fire your update tag.
Step 5 — Test in GTM Preview and GA4 DebugView
Testing is the most commonly skipped step and the source of most implementation problems. Use all three tools in sequence.
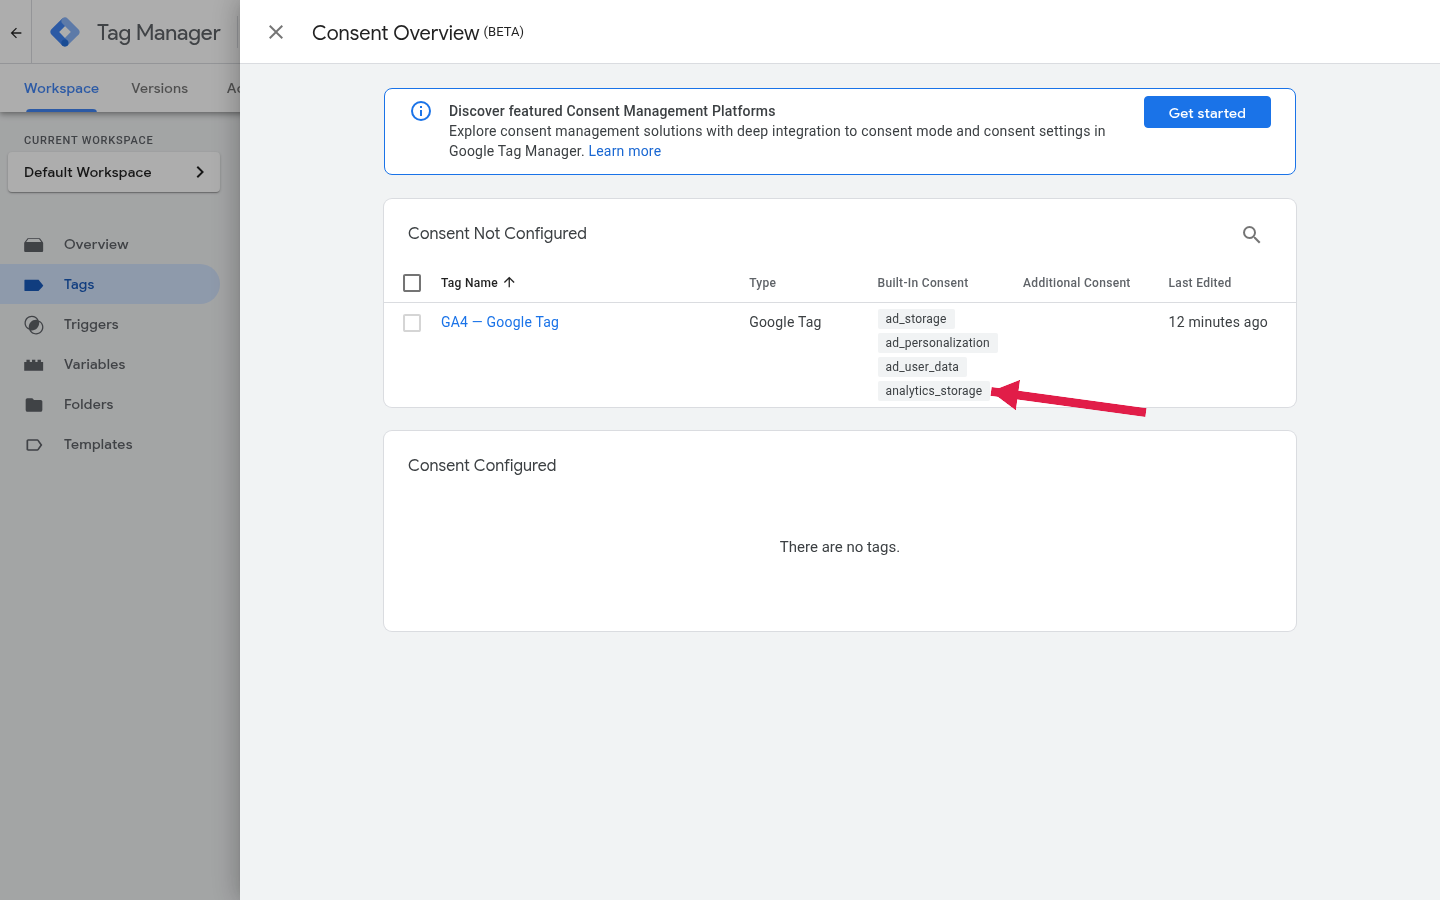
GTM Preview mode: Open GTM Preview and navigate to your site. In the Tag Assistant summary panel, look for the Consent Overview tab. It shows the consent state for each parameter at each point in the page load. Confirm that the default state shows denied before the consent banner appears, and that parameters flip to granted after you accept cookies.
You can also use this to verify your GTM setup is reading the consent signals correctly — the Consent Overview panel makes it visible without needing to read network requests.
Network tab in browser DevTools: Filter for requests to google-analytics.com or googletagmanager.com. When consent is denied, you should see GA4 pings with the parameter gcs=G100 (all denied). When consent is granted, you’ll see gcs=G111. The gcs parameter encodes the current consent state as a bitmask.
GA4 DebugView: In GA4, navigate to Admin > DebugView. With your device in debug mode (via GTM Preview or the GA Debugger extension), watch incoming events. Confirmed events show consent state alongside the event name. This verifies end-to-end that GA4 is receiving and logging the correct consent context.
Practical Examples
Cookiebot integration walkthrough
When I configured Consent Mode v2 for a client running WooCommerce with a significant UK and German audience, Cookiebot was already installed but hadn’t been updated for v2. The update process took about 20 minutes.
- In GTM, search the Template Gallery for “Cookiebot CMP” and add it to your workspace
- Create a new tag using the Cookiebot template. Set the trigger to Consent Initialization — All Pages
- In the tag configuration, enable “Google Consent Mode v2” and set default states to
deniedfor all four parameters - In Cookiebot’s dashboard, verify the GTM integration is active and that the “Google Consent Mode” option is enabled
- Publish your GTM container
- Open GTM Preview, accept or deny cookies on the consent banner, and check the Consent Overview panel to confirm the state changes correctly
Cookiebot’s own Google Consent Mode documentation covers the GTM template configuration in detail, including how to enable v2 parameters in the Cookiebot dashboard.
The critical thing I checked: the Cookiebot tag was firing on the Consent Initialization trigger, not on DOM Ready or Page View. The sequence matters. If the default consent call fires after GA4 has already attempted to fire, you’ve lost the window where cookieless mode matters.
Manual implementation without a CMP
For smaller sites that haven’t adopted a CMP and are using a simple custom cookie notice, the manual path involves three elements: the default consent script in the <head>, a listener for the user’s consent choice, and the update call.
The default consent block goes immediately after the GTM snippet (or as a Custom HTML tag on Consent Initialization). Your custom banner needs to push a dataLayer event when the user accepts or declines. A minimal data layer push on acceptance looks like:
window.dataLayer = window.dataLayer || [];
window.dataLayer.push({
  'event': 'consent_update',
  'ad_storage': 'granted',
  'analytics_storage': 'granted',
  'ad_user_data': 'granted',
  'ad_personalization': 'granted'
});
In GTM, create a Custom Event trigger listening for consent_update. Attach a Custom HTML tag to it that reads those data layer variables and calls gtag('consent', 'update', {...}). Configure Data Layer Variables in GTM to pull the individual parameter values from the event.
This approach gives you full control, but it requires careful testing. One mistake I’ve seen repeatedly: the banner shows a “declined” path that doesn’t push any event, so GTM never fires the update call for denied users. The default state stays in place — which is actually correct behavior, but confirm it’s intentional. For users who leave the banner without responding, the default denied state persists for that session.
For a deeper look at how the client-side vs server-side tagging choice affects consent mode implementation, that context is worth reading before finalizing your architecture.
Common Mistakes to Avoid
After setting up Consent Mode v2 across a number of sites, these are the issues that come up most often:
- Default call fires too late. If the Consent Initialization trigger isn’t being used and the default consent script runs after DOM Ready, your tags may have already fired without the consent gate in place. Always use the Consent Initialization trigger type in GTM.
- Missing
ad_user_dataandad_personalization. Many existing implementations were built for v1 and only setad_storageandanalytics_storage. Leaving out the two new v2 parameters means Google treats your setup as incomplete. - CMP integration not updated. Some CMP plugins and templates that worked for v1 don’t pass the new parameters. Check your CMP’s changelog for a specific v2 update — version numbers and release dates are published by most major vendors.
- Not testing the deny path. Most testing focuses on the accept flow. The deny path matters equally. Open GTM Preview, decline all cookies, and confirm that the Consent Overview shows all four parameters as
deniedand that your ad/analytics tags show “Consent Check Failed” in the summary. - Applying default deny globally without geo conditions. If you serve a US-only audience, blanket
denieddefaults reduce your analytics coverage unnecessarily. Use GTM’s built-in geographic variables or your CMP’s geo-targeting to apply consent mode defaults only to EEA visitors. - Skipping conversion modeling validation. After going live, check GA4’s conversion reports after 7–14 days. Modeled conversions appear alongside observed ones in the interface. If you see zero modeled conversions for EEA users where a meaningful percentage should be denying, your update calls aren’t reaching Google correctly.
How Conversion Modeling Handles Denied Consent
When consent is denied in Advanced mode, GA4 and Google Ads don’t just go dark. The tags operate in a limited mode: they send cookieless, aggregated pings with no user-identifiable information. Google’s systems use these signals, combined with patterns from users who did consent, to statistically model the conversions that are missing from the denied population.
How much signal gets recovered depends on three variables: traffic volume, consent rate, and the behavioral similarity between consented and denied users. Google’s published modeling accuracy data confirms recovery is highly variable — not a fixed rate. Per Google Ads documentation on consent-mode modeling, conversion modeling can recover a meaningful share of denied-consent conversions: typically 15–50%, up to ~70% for high-volume sites with strong consent rates. Modeling only activates once thresholds are met: at least 700 ad clicks over 7 days per country and domain, at least 7 days of data, and a sufficient consent rate (roughly 20% or more granting consent). Below those thresholds, modeling doesn’t activate and denied conversions remain unrecovered.
In practice: if 35% of your EEA visitors deny all cookies and you’re running Smart Bidding campaigns, Advanced Consent Mode gives your bidding algorithms a fuller picture than the 65% direct-consent signal alone. Even partial recovery — say, 20% of the denied 35%, adding roughly 7 percentage points — meaningfully outperforms Basic mode, which recovers nothing. Without any form of Consent Mode, Smart Bidding operates on the 65% direct signal and that gap compounds into progressively worse bid decisions over time.
Conversion modeling is also why the choice between advanced and basic consent mode has real business consequences, not just compliance ones. For sites investing in Google Ads for EEA markets, the data recovery difference justifies the additional CMP integration work — even at the conservative end of the recovery range.
For a broader look at how privacy regulations are reshaping measurement architecture, cookieless measurement strategies covers the landscape beyond consent mode alone.
Continue Learning
These articles build on what you’ve set up here:
- Client-side vs server-side tagging — understand how your tag architecture affects consent signal delivery and data collection
- How to verify your GTM setup is working — the full GTM debugging workflow, including the Consent Overview panel and Tag Assistant
- Cookieless measurement strategies — consent mode is one layer of a privacy-first measurement stack; this covers the broader options
Bottom Line
Google Consent Mode v2 is not a checkbox exercise. It’s the mechanism that keeps your GA4 and Google Ads data directionally accurate under GDPR and DMA constraints. The two new parameters — ad_user_data and ad_personalization — are what differentiate v2 from v1, and leaving them out means incomplete compliance and degraded conversion modeling.
If you’re starting fresh: choose Advanced Consent Mode, use a certified CMP with a GTM template, and test both the accept and deny paths before you consider the setup complete. If you already have v1 in place, the update is usually a CMP configuration change and a GTM container republish — not a ground-up rebuild.
The setup process involves more moving parts than a standard tag deployment, but the verification steps are straightforward once you know what to look for in GTM Preview and GA4 DebugView. Make sure to test with actual consent interactions, not just page loads.