Tracking Setup
Server-Side Tagging: What It Is, Why It Matters, and How to Get Started
Every tag you add to your website runs in the visitor’s browser. More tags mean more JavaScript, slower pages, and data vulnerable to ad blockers. That was acceptable when browsers were permissive and users didn’t block trackers. Today, it’s a liability.
Server-side tagging changes this equation. Instead of firing tags in the browser, you send data to your own server first, then forward it to analytics and marketing platforms. The result: faster pages, more accurate data, and control over what information leaves your infrastructure.
In this guide, I’ll explain what server-side tagging actually is, why it matters now more than ever, and how to get started with Google Tag Manager’s server-side container. This isn’t a full implementation tutorial — it’s the foundation you need before diving into technical setup.
What Is Server-Side Tagging?
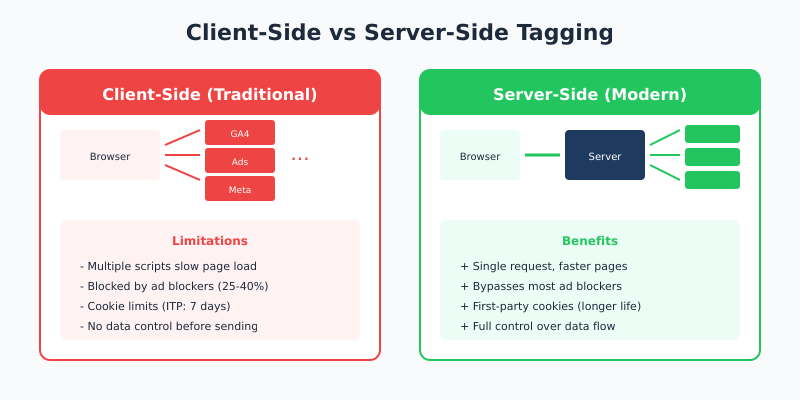
Traditional tracking (client-side) works like this: a visitor loads your page, JavaScript tags execute in their browser, and each tag sends data directly to its destination — Google Analytics, Meta, your ad platforms, and so on.
Server-side tagging adds a middle layer. Instead of tags firing in the browser, you:
- Send a single data stream from the browser to your server
- Process and validate that data on your server
- Forward it to the platforms that need it
Think of it as a control room between your website and third-party services. Everything passes through your infrastructure first, giving you visibility and control over every piece of data that leaves.
Related: Client-side vs server-side tagging: what’s the difference
How It Works with Google Tag Manager
Google Tag Manager offers two container types:
| Container Type | Runs On | Purpose |
|---|---|---|
| Web Container | Visitor’s browser | Traditional client-side tagging |
| Server Container | Your cloud server | Server-side processing and forwarding |
The server container runs on cloud infrastructure you control — typically Google Cloud Platform, AWS, or a managed service like Stape. It receives incoming requests, processes them using server-side tags, and sends data to final destinations.
Your web container still exists, but its job changes. Instead of firing dozens of marketing tags, it sends one consolidated data stream to your server container. The server handles everything else.
Why Server-Side Tagging Matters Now
Server-side tagging existed for years as a niche technique. Three forces made it essential:
Browser Privacy Restrictions
Safari’s Intelligent Tracking Prevention (ITP) limits cookie duration to 7 days for client-side cookies — sometimes just 24 hours. Firefox has Enhanced Tracking Protection. Chrome is implementing Privacy Sandbox. These restrictions break traditional tracking in measurable ways.
Server-side tagging uses first-party cookies set through your own subdomain (like data.yourdomain.com). Browsers treat these differently than third-party tracking cookies, which means longer cookie lifespans and more accurate user identification.
Ad Blocker Prevalence
Depending on your audience, 25-40% of visitors may use ad blockers. Most blockers target known tracking domains and JavaScript patterns. When they block your analytics tag, you lose that visitor’s data entirely.
Server-side requests to your own subdomain look like regular first-party traffic. Ad blockers can’t easily distinguish legitimate site functionality from tracking, so your data collection survives where client-side would fail.
Page Performance Impact
Every client-side tag adds JavaScript that must download, parse, and execute. A typical marketing stack might include:
- Google Analytics
- Google Ads conversion tracking
- Meta Pixel
- LinkedIn Insight Tag
- Hotjar or similar
- Various retargeting pixels
That’s 6+ external scripts, each making network requests and running code in the browser. Server-side tagging consolidates this into one lightweight request to your server. The server handles the rest without affecting the visitor’s experience.
Related: Beyond pageviews: engagement metrics that matter — accurate metrics require accurate data collection.
Key Benefits of Server-Side Tagging
Let me break down the practical advantages I’ve seen when implementing server-side setups for clients.
Better Data Accuracy
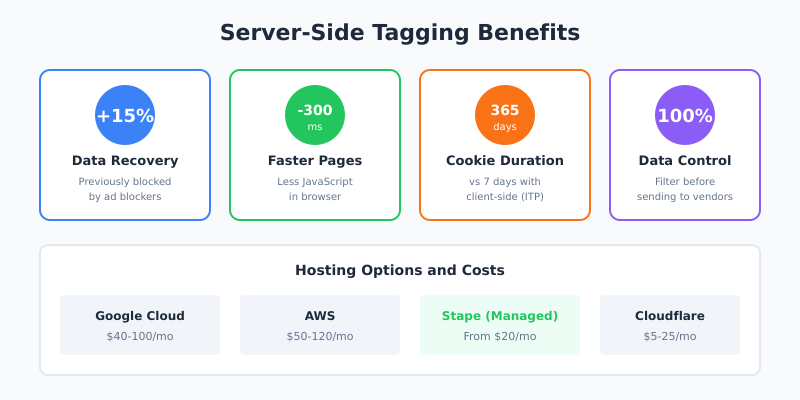
In my experience, switching to server-side tagging typically recovers 10-20% of previously lost data. The exact number depends on your audience — tech-savvy users with ad blockers show the biggest improvement.
You also get cleaner data. Server-side processing lets you validate, transform, and enrich events before they reach analytics platforms. Bad data gets filtered; good data gets enhanced.
Improved Page Speed
Fewer scripts in the browser means faster pages. I’ve measured 200-500ms improvements in Time to Interactive after moving tags server-side. For e-commerce sites, that translates directly to conversion rate improvements.
Data Privacy Control
With server-side tagging, you control exactly what data reaches third parties. Need to strip IP addresses before sending to Google Analytics? Hash email addresses before they reach Meta? Remove sensitive parameters entirely? You implement these rules on your server.
This matters for GDPR, CCPA, and similar regulations. Instead of trusting each vendor’s privacy practices, you enforce privacy at your infrastructure layer. If you’d rather avoid third-party cookies altogether, a self-hosted, cookieless platform such as Umami is another route to the same goal.
Extended Cookie Duration
First-party cookies set through your server subdomain aren’t subject to the same restrictions as client-side cookies. Where ITP might limit a client-side cookie to 7 days, a server-set cookie can persist for months or years (within your configured limits).
Longer cookie duration means better user recognition across sessions, more accurate attribution, and more reliable conversion tracking.
What You Need to Get Started
Server-side tagging requires infrastructure and configuration. Here’s what you’ll need:
Server Container Hosting
Your server container needs to run somewhere. Options include:
| Option | Starting Cost | Best For |
|---|---|---|
| Google Cloud Platform | ~$40-100/month | Full control, Google ecosystem |
| AWS | ~$50-120/month | Existing AWS infrastructure |
| Stape.io | $20/month | Managed service, easier setup |
| Cloudflare Workers | $5-25/month | Edge deployment, technical users |
Costs scale with traffic. A site with 100,000 monthly visitors might pay $30-50/month; a site with millions of visitors could pay several hundred.
Custom Subdomain
You’ll need a subdomain like data.yourdomain.com or gtm.yourdomain.com pointing to your server container. This is what makes your tracking appear as first-party — requests go to your domain, not google-analytics.com.
Setting this up requires DNS configuration and SSL certificates. Managed services like Stape handle this automatically; self-hosted setups require manual configuration.
Technical Knowledge
Server-side tagging is more complex than dropping a script on your site. You’ll need familiarity with:
- Google Tag Manager concepts (tags, triggers, variables)
- Basic cloud infrastructure (or willingness to learn)
- HTTP requests and data flows
- Your specific analytics and marketing platforms
If you’re comfortable with GTM’s web container, you can learn server-side. But expect a steeper learning curve and more debugging.
Related: How to check if your GTM is working properly
Basic Architecture Overview
Here’s how a typical server-side setup flows:
- User visits your site — Your web container loads
- Web container sends data — One request to your server subdomain (
data.yourdomain.com) - Server container receives request — Validates and processes the data
- Server container fires tags — Sends processed data to GA4, Meta, Google Ads, etc.
- Platforms receive data — Clean, validated, privacy-compliant data arrives
The key insight: steps 3-5 happen on your server, invisible to the user’s browser. No extra JavaScript, no blocked requests, no performance impact.
What Stays Client-Side
Not everything moves to the server. Some data can only be collected in the browser:
- Scroll depth and viewport information
- Time on page (real-time)
- Mouse movements and click coordinates
- Form field interactions
Your web container captures these browser-specific events and includes them in the data stream to your server. The server can’t observe what happens in the browser directly — it only knows what the browser tells it.
Common Implementation Approaches
There’s no single right way to implement server-side tagging. The approach depends on your needs and technical resources.
Approach 1: Full Server-Side Migration
Move all tracking to server-side. The web container only sends a data stream; all tag logic lives in the server container.
Pros: Maximum performance benefit, cleanest architecture
Cons: Most complex, some vendors don’t support server-side fully
Best for: Technical teams with resources for full implementation
Approach 2: Hybrid Setup
Critical tags (analytics, conversions) run server-side. Secondary tags (chat widgets, feedback tools) stay client-side.
Pros: Practical balance, faster implementation
Cons: Still some client-side performance impact
Best for: Most businesses starting with server-side
Approach 3: Server-Side for Specific Platforms
Only move problematic platforms (those most affected by ad blockers or privacy restrictions) to server-side. Either way, layer in Consent Mode v2 so Google still receives the modeled signals it expects once users decline cookies.
Pros: Minimal changes, targeted improvement
Cons: Doesn’t address performance holistically
Best for: Quick wins while planning larger migration
Platforms That Support Server-Side
Most major platforms now offer server-side integration, though quality varies:
| Platform | Server-Side Support | Notes |
|---|---|---|
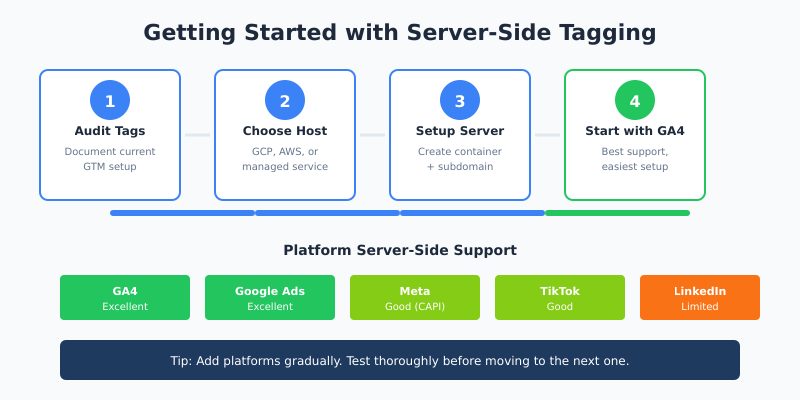
| Google Analytics 4 | Excellent | Native GTM server-side tag |
| Google Ads | Excellent | Conversion tracking, remarketing |
| Meta (Facebook) | Good | Conversions API integration |
| TikTok | Good | Events API support |
| Limited | Conversions API available | |
| Good | Conversions API | |
| Snapchat | Good | Conversions API |
For platforms without native server-side tags, you can often use HTTP request tags to send data to their APIs directly. It requires more configuration but achieves the same result.
Costs and Considerations
Server-side tagging isn’t free. Before committing, understand the true costs:
Infrastructure Costs
Hosting your server container costs money. Budget $20-150/month for small to medium sites, more for high-traffic properties. This is ongoing — not a one-time expense.
Implementation Time
A basic server-side setup takes 8-20 hours for someone familiar with GTM. Complex implementations with multiple platforms, custom transformations, and thorough testing can take 40+ hours.
Maintenance Overhead
Server-side setups require monitoring. Servers can fail, containers need updates, and platform APIs change. Plan for ongoing maintenance — this isn’t “set and forget.”
When It’s Worth It
Server-side tagging makes sense when:
- Ad blockers are costing you significant data (check your bot/direct traffic patterns)
- Page speed is a priority and you have many tracking scripts
- Privacy compliance requires data control before it reaches vendors
- You need accurate conversion tracking for ad platform optimization
- Cookie restrictions are hurting attribution accuracy
When to Wait
It might not be worth the complexity if:
- Your traffic is low (under 10,000 monthly visitors)
- You only use one or two tracking platforms
- You lack technical resources for implementation and maintenance
- Your current tracking accuracy is acceptable
Related: Do you need analytics at all? — sometimes simpler is better.
Getting Started: First Steps
If you’ve decided server-side tagging is right for you, here’s how to begin:
Step 1: Audit Your Current Setup
Document every tag in your current GTM container. List which platforms they serve, what data they send, and how critical they are. This inventory guides your migration plan.
Step 2: Choose Your Hosting
For most teams, I recommend starting with a managed service like Stape. The cost difference versus self-hosting is minimal, and you skip significant setup complexity. You can migrate to self-hosted later if needed.
Step 3: Set Up Server Container
Create a server container in GTM. Follow Google’s official documentation or your managed service’s guides. Configure your custom subdomain and verify it’s working.
Step 4: Start with GA4
Google Analytics 4 has the best server-side support. Set up server-side GA4 tracking first — it’s the easiest win and teaches you the server-side workflow.
Step 5: Add Platforms Gradually
Don’t migrate everything at once. Add one platform at a time, test thoroughly, and verify data accuracy before moving to the next. Rushing leads to tracking gaps and data loss.
Step 6: Monitor and Validate
Use GTM’s preview mode for both containers. Check real-time reports in your analytics platforms. Compare server-side data against client-side (run both briefly) to ensure nothing is lost.
Continue Learning
Explore more guides on tracking implementation:
- Client-side vs server-side tagging — detailed comparison of both approaches
- Event tracking basics — understand event data before moving it server-side
- How to check if GTM is working — verification techniques that apply to server containers too
Bottom Line
Server-side tagging is the future of web tracking. Browser restrictions, ad blockers, and privacy regulations make traditional client-side tracking increasingly unreliable. Moving tags to your server gives you control, improves accuracy, and future-proofs your measurement infrastructure.
The trade-off is complexity. Server-side requires infrastructure, technical knowledge, and ongoing maintenance. It’s not right for every site — but for businesses that depend on accurate analytics and marketing data, the investment pays for itself.
Start small. Set up a server container, migrate GA4 first, and learn the workflow before tackling your entire marketing stack. The learning curve is real, but the capability you gain is worth it.